In this article, we will learn How to Use the Sfc Scannow Command, a Windows System File Checker utility to scan Windows and restore System files if your Windows functions aren’t working or Windows crashes.
SFC.exe, the System File Checker command-line tool built into Windows 11, scans your Windows for and repairs missing, or corrupted Windows system files, including Windows DLL files. System File checker is a part of Windows Resource Protection, which protects registry keys, folders, and critical system files.
Run the System File Checker tool (SFC.exe)
SFC or System File Checker tool is a built-in tool by Microsoft, available in the C:\Windows\System32 folder. If your Windows 11 starts malfunctioning, applications are failing, Windows features don’t work properly, random errors occur, there is a possibility that the Windows system files might be corrupted, modified, or missing. Sfc /scannow command is the most common way to use the System File Checker tool.
Usually, this happens with System files after installing windows updates, installing drives, or any manual system file-related activity. Whatever the reason, if Windows 11 is experiencing any related issues, Microsoft introduces the System File Checker command-line tool to check the integrity, detect problems with System Files, and repair or replace the modified or corrupted files. Thus, it is recommended, instead of planning System restore, consider running the System File Checker command-line utility first.
Run Sfc /Scannow command in Windows 11
Sfc /Scannow command needs elevated command prompt window to run. Sfc /Scannow command is also available in Windows 10, Windows 8.1, Windows 8, Windows 7, and earlier versions.
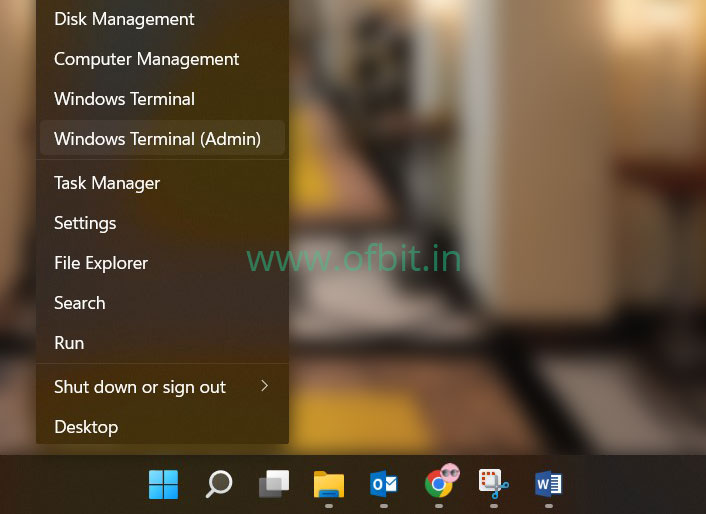
Step 1: Run the Command Prompt as Administrator.
On Windows 11 if you right-click on the Start menu, you will find Windows Terminal (Admin) instead of Command Prompt (Admin) or Windows PowerShell (Admin) which you used to see in Windows 10 and earlier versions.
Step 2: Run Sfc /Scannow Command.
On the elevated command prompt, type the below command and hit Enter.
scf /scannow
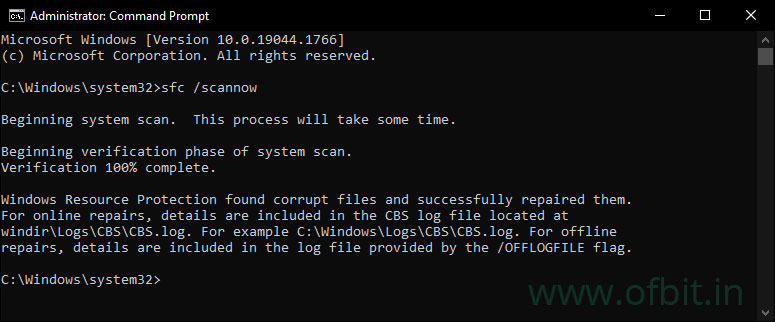
That’s it. Windows System File Checker will now first start the Verification phase and Scan all protected system files. Do now close the Windows until the verification is 100% complete. Upon completion of verification you may see the following statements:
Windows Resource Protection did not find any integrity violations. – This means System File Checker does not find any corrupted, modified, or missing system files on Windows.
Windows Recourses Protection found corrupt files and successfully repaired them. – This means System File Checker found corrupted files, it replaces them with a cached copy that is located in a compressed folder at %WinDir%\System32\dllcache.
Windows Resource Protection could not perform the requested operation. – You need to run the System File Checker scan in safe mode.
Windows Resource Protection found corrupt files but was unable to fix some of them. – To resolve this, you need to replace the corrupted files with the known good copy of that system file.
If any corrupt file is detected, you will get the details in the CBS log file, which is located at %WinDir%\Logs\CBS\CBS.log. CBS log contains all the details that are captured during the verification of the System scan.
When the verification is 100% complete, it may not prompt for a restart. Close the command prompt window and Restart the Computer anyway. Once restarted, check if Sfc /scannow command resolved it.
Follow us:
If you like our articles and tutorials, you can follow us on Facebook. Also, join our Official Facebook Group for Q&A sessions and Discussions with the worldwide technical community.